Search Results for: buttermilk biscuits

Homemade Buttermilk Biscuits

We are having a great Saturday here around the farm. It started this morning with a big Southern breakfast at the request of my oldest son. (Big Southern breakfast to us includes: grits, eggs, bacon, sausage, homemade bisuits and preserves, and sliced cantaloupe!) I made homemade biscuits this morning, and I wanted to share my recipe. I have the ingredients down to measured amounts – which is unusual for most Southern women and their “pinch here and there” while making biscuits!

Gran Jan’s Homemade Buttermilk Biscuits
(This makes about 10-12 medium sized biscuits.)
2 1/2 cups of White Lily self-rising flour
1 stick of frozen salted butter, grated with a box grater
1 cup of whole buttermilk

  • Preheat oven to 450 degrees.
  • Lightly grease a cast iron skillet (or baking sheet if you don’t have a skillet. I use this cast iron skillet for baking biscuits and absolutely love it! It is made by Lodge Manufacturing. 
  • Measure the White Lily self-rising flour out into a large mixing bowl.
  • Using the course side of a box grater, grate the stick of frozen butter directly into the self-rising flour. Work quickly now and mix the flour and frozen butter pieces together for even distribution. 
  • Next, make a little well in the middle of the flour/butter mixture, and pour in the 1 cup of buttermilk and mix until just combined, using a spatula. About 12-15 good “stirs” is plenty! 
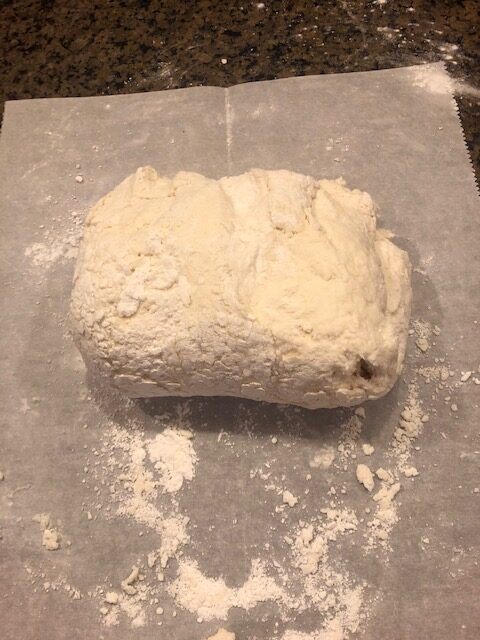
  • Dump the sticky dough out onto a floured service. I use parchment paper. Flour your hands well and quickly pat the dough into a 1/2″ thick rectangle – about the size of a sheet of notebook paper.
  • Now for the folding technique – which creates the beautiful layers in your biscuits: fold your dough “rectangle” in half, then turn clockwise and fold again, turn clockwise and fold again. Smooth it back into the rectangle shape and you’re ready to cut the biscuits out now!
  • Take your biscuit cutter and dip in into some flour and go straight down and back up. Don’t twist the cutter. Place the biscuits on the skillet closely, touching each other.
  • When you’ve cut all you can out of that batch, refold your dough again a couple of times and use the cutter to finish out the dough. You may even have to roll the very last biscuit out with your hands.
  • Put the skillet in the hot oven at 450 degrees and bake the biscuits 15-18 minutes, until lightly browned.
  • Remove from the oven and brush the tops with melted butter.
  • Today I felt a little whimsical fancy and decided to use one of my antique biscuit cutters. I bought the biscuit cutters at an antique market in Atlanta several years ago. I used the scalloped edge biscuit cutter today. I have a large one and a small one. (The three small biscuits were for the grandchildren.) After breakfast my husband, son, and grandson all decided to take a swim in the pond. They had the most wonderful time and swam for almost 2 hours…which means they had hearty appetites for lunch!  These hearty appetites led to another Southern delicacy…Tomato Sandwiches!!!
I am very thankful for the garden bounty we’ve had this summer.  I love to garden for the pure joy it brings me, but the side benefit of the delicious produce is wonderful this time of year.
My youngest son and his wife and son joined us for lunch today and we had a wonderful time around the table. The grandchildren are at the age now where they can play together a bit more. Zeke will be 3 next month and Madie Ruth and Jackson are both almost 14 months old.  Good times indeed.  I am counting my blessings this Saturday, and family time is right up there at the top of my list!!!
 
Happy Biscuit Baking!
 
Share

National Buttermilk Biscuit Day!

Today is National Buttermilk Biscuit Day! All that know me well, know I love to make and teach others how to make biscuits. I help with a mentoring-in-the-kitchen ministry at my church called “Tasting Grace.” Our purpose is to teach the joy of biblical hospitality, serving others in the love of Christ.

So today I am going to share my tried and true recipe here, with pictures. It’s an easy recipe with only three simple ingredients. The more you make them, your confidence will grow. That’s what my Granny always told me, and she taught me how many years ago.

Three Simple Ingredients:

2 1/2 cups of White Lily self-rising flour

1 cup of Whole Buttermilk

1 stick of Frozen Butter (I use salted)

Makes between 8-12 biscuits depending on the size of your biscuit cutter!

NOTE: You will need a little extra flour to keep your hands “dusted” during the folding process; and some extra butter to melt for the finished biscuits. About a half-stick will do!

Preheat your oven to 450 degrees and lightly grease (I use Crisco) a cast iron skillet. I love the Lodge 10.5″ griddle pictured here. I’ve seen them at Walmart and hardware stores too.

Measure the self-rising flour into a large bowl. I love to use clear glass bowls for all my baking prep.

Using the larger holes of a box grater, grate the stick of frozen butter and then pour into the bowl of flour. Work quickly now to mix the flour and butter together. I call it “pinching in” the butter for even distribution. You don’t want to handle it too much or cause the butter to melt.

Pour in the 1 cup of buttermilk and mix well. I use my hand, but you may use a spatula if you prefer.

Mix just until everything starts to “come together.” DO NOT OVERWORK THIS BEAUTIFUL DOUGH!

Now dust your hands with some of the extra flour and turn the sticky dough out onto a piece of parchment paper (or your counter if you don’t mind the mess)!

Pat the dough into a nice rectangle about the size of a piece of notebook paper, about 1/2″ thick. (Not shown in picture.)

Pay close attention to the next two steps – this is the FOLDING technique and creates the wonderful layers in your biscuits. First, fold the dough in thirds. See the picture? Fold the right side in and then the left. (Not shown in the picture – just fold the left side in! You’ve got this!)

Now take your folded dough rectangle and fold it again, this time in half!

After you’ve folded into thirds and then halves, smooth your dough into a beautiful nice rectangle about 1″ thick and the size of a piece of notebook paper.

But once again, don’t “handle” the dough too much!

Now take your biscuit cutter or a smooth glass, and dip it in some extra flour. Go STRAIGHT DOWN and UP. No twisting or turning. Just up and out.

Place the biscuits close together on your greased skillet.

Take your extra dough and shape it back into a rectangle again so you can cut out the rest of the biscuits.

Remember, don’t work the dough too much. You may have to just roll the last one out with your hands!

Put your skillet into the pre-heated hot oven and bake the biscuits 15-18 minutes, until lightly browned. Mine are perfect at about 17 minutes in my oven.

Remove the skillet from the oven and brush the tops with melted butter.

This recipe doubles easily, but I don’t do that unless I’m feeding a crowd! I hope you enjoy trying my recipe and will let me know if you make them.

Blessings on your beautiful buttermilk biscuit making.

Gran Jan

Share

Biscuits & Sausage Gravy


A week ago my friend and ministry partner Jan Hamil and I hosted the Spring Session of our Tasting Grace Mentoring Ministry. We went Southern all the way with homemade biscuits and delicious sausage gravy.  Tasting Grace is a “mentoring-in-the-kitchen” ministry of encouragement. It is our passion, and we have loved every single moment we’ve spent in the kitchen with the women who attend. Women of all ages attend and that is part of the joy!

This past Saturday I was blessed to serve by teaching two sessions on Tasting Grace at the 2017 Georgia Baptist Women’s Spring Event.  I had the absolute best time! My husband Gary came and supported me and I am so thankful for him. He was so much help and the sweet attendees purchased 70 Tasting Grace books. I pray each and every one of them caught the JOY of Tasting Grace “kitchen mentoring,” and will use it as a ministry outreach in her church and community.

I wanted to share the recipes here with anyone who happens to stop by.  As I shared with the girls last week, this is a moderation meal. Not something you eat often, but definitely enjoy on those occasions you prepare this delightful Southern delicacy.

BUTTERMILK BISCUITS – Doubles easily!
(This makes about 10-12 medium sized biscuits.)
2 1/2 cups of White Lily self-rising flour
1 stick of frozen (or very very cold) butter (salted)
1 cup of buttermilk
1/2 stick of melted butter to brush biscuit tops when done

  1. Preheat oven to 450 degrees.
  2. Lightly grease a cast iron skillet or baking sheet pan w/Crisco. I prefer cast iron all the way!
  3. Measure 2 1/2 cups of self-rising flour into a large bowl. Now, using a grater, grate the cold butter into 2 1/2 cups of self-rising flour. Use the bigger “side” of the grater, not the coarse grind side. Toss flour and butter together. 
  4. Next, pour the 1 cup of buttermilk into the flour/butter and mix well. Using a spatula, stir about 15-17 times. Don’t overmix.
  5. Now wash and dry your hands well and then “dust” your hands with more flour.
  6. Dump the dough onto a floured surface and pat it all into a nice rectangle shape about the size of a piece of notebook paper, about 1/2″ thick. Fold the dough up and over so it’s in half, and then turn it clockwise, fold in half again, and turn again. Do this about 4-5 times. This creates all the layers in your biscuits.
  7. Using a 2 1/2 to 3″ biscuit cutter, cut out the biscuits. Refold the dough as needed. Place them on a greased cast iron skillet and bake at 450 degrees until golden brown, about 15-20 minutes. Brush the hot biscuits with melted butter.

    NOW FOR THE “PINCH & PAT” HAND-ROLLED METHOD: 
    1.  With floured hands, pinch off some dough, enough to fit in your palm  (you’ll get the size down as you make more and more biscuits) and roll it by cupping your hands with your palms sufficiently floured. Don’t handle the dough too much – my Grandmother always told me the biscuits would be tough if you overwork the dough. Just a quick knead is all you need! You will get better each time you make biscuits.
    2.  Place the biscuits on the pan so they touch each other – this makes them softer. There’s a lesson here in staying close and working together! Amen!
    3. Bake for 15-20 minutes or until golden brown. Brush with melted butter and serve.

The Fine Art of Biscuit-Making ~ “Roll & Cut Out” Biscuits OR “Pinching & Patting

  • I can make biscuits both ways – rolling out the dough and cutting them with a biscuit cutter, or as a pincher-patter-placer biscuit maker, which is how my Granny taught me. I prefer to roll the dough and cut the biscuits out with a biscuit cutter. I have a nice collection of biscuit cutters.

    EITHER WAY YOU CHOOSE: Always do the following!

  • Accurately measure ingredients. Flour is measured by the “SPOON & LEVEL” method – spooning into a measuring cup and leveling off with a straight edge (like a butter knife). Sifting is not needed.
  • Butter should be cold, very cold.  Cold enough to grate. I keep butter in the freezer all the time to be ready to make biscuits. 
  • Always use whole buttermilk,  not low-fat! And the buttermilk should be very cold!
  • Mixing the liquid ingredients into the dry ones can be done effectively with a fork or a spatula. Either way, just don’t overmix.
  • If using a biscuit cutter, just cut straight down without twisting the cutter to ensure tall, straight biscuits.
  • Place on a baking sheet 1-inch apart for crusty sides or touching for soft sides.

SAUSAGE GRAVY – doubles easily!
(Serves 4-6)
1 lb. Jimmy Dean pork sausage (mild, hot, sage flavored or a mixture)
[I like to mix the hot and sage sausage together, and then double the recipe by using a pound of each.]
Salt and pepper to taste
1/3 cup White Lily all-purpose flour
4 cups whole milk
1/3 stick of salted butter

  1. Crumble sausage and brown over medium heat until no longer pink. Season with salt and pepper. You will be amazed at how lean this Jimmy Dean sausage is – no grease to drain!
  2. Reduce the heat to medium-low and then sprinkle on the 1/3 cup of flour and mix well so that the sausage soaks up the flour. Keep stirring the sausage and flour together for another couple of minutes until the raw flour is cooked through.
  3. Now slowly pour in about 4 cups of the milk, stirring constantly.
  4. Continue to cook the gravy, stirring frequently, until it thickens. (This may take a good 5 minutes or so.)
  5. Now go ahead and add the butter and stir well. You are done!
  6. Spoon the sausage gravy over warm buttermilk biscuits and serve immediately. It is sooooooooooooooo good!

My friend, you will love serving your family this comfort food.  I plan to make this for breakfast when my family is together for our beach vacation this summer. I know my boys will love it and I hope to teach it to my daughters-in-law.  I’ve taught them both how to make biscuits, sausage gravy is next!

Happy May Day to all,

Gran Jan

Share

Sausage Gravy!

Good old Southern Sausage Gravy is a favorite breakfast of my husband. It really is also a good supper meal on a cold winter night. It is most assuredly a meal that you eat in moderation!

It is actually very simple to make – here is my tried and true recipe.

Note – this recipe doubles well!

INGREDIENTS – (Serves 4-6)
1 lb. Jimmy Dean pork sausage (mild, hot, sage-flavored or a mixture)
[We like to mix the hot and sage flavors together.]
Salt and pepper to taste
1/3 cup of White Lily all purpose flour
4 cups of whole milk
1/3 stick of salted butter

  1. Crumble the sausage and brown over medium heat until no longer pink. Season with salt and pepper at this time. You will be amazed at how lean this Jimmy Dean sausage is – no grease to drain!
  2. Reduce the heat to medium-low and then sprinkle on the 1/3 cup of flour and mix well so that the sausage soaks up the flour. Keep stirring the sausage and flour together for another couple of minutes until the “raw flour” has cooked through.
  3. Now slowly pour in the 4 cups of the milk, stirring constantly.
  4. Continue to cook the gravy, stirring frequently, until it thickens. (This may take a good 5-7 minutes.)
  5. Now go ahead and add the butter and stir well. You are done!
  6. Spoon the sausage gravy over warm buttermilk biscuits and serve immediately. It is sooooooooooooooo good!

Happy Sausage Gravy Making!
Gran Jan

Share

Fig Preserves!

I made this batch of fig preserves last week with figs from my very own tree! My husband gave me the tree for Mother’s Day, 2016. They are “Brown Turkey” variety figs. Delicious! It was the first time I had used home-grown figs!

Needed: Fresh figs, sugar, canning equipment, time, and lots of patience. Your figs will need to soak overnight in a stockpot that is layered with figs and sugar. Details below in the post!

This recipe works regardless of the amount of figs you are blessed to have. No measuring!

My dad had 8 sisters (7 older and 1 younger ). One of them, my Aunt Jimmie Lou, is the one who taught me how to make these old-fashioned fig preserves. Now normally I am a cook who measures; however, not when making fig preserves. But I promise it’s easy, and you will be able to make them too. There are only two ingredients – figs and sugar!

  • First rinse the figs in cool water, and remove all the stems, inspecting and discarding any that are mushy. Next, I soak the figs in my kitchen sink in cool water for about 30 minutes or so. I then drain them by giving them a final cool rinse in a colander.  
  • Next, I get a large bowl, then I cut half of the figs in half and leave half of them whole and place them in the bowl. “Cut half in half and leave half whole.” How’s that for measuring? 🙂 This has proven to be the best texture we enjoy for the preserves. We like for some of them to remain whole.
  • Now take a large stock pot and alternate a layer of sugar and a layer of figs. (Begin with a layer of sugar in the bottom of the pan, and end with a layer of sugar on top.)
  • No matter what size stock pot or heavy pan you use to layer the figs and sugar, just generously cover the figs with a nice layer of sugar. Let me say here that I do not go overboard with the sugar because I like to taste the figs.
  • Now put a lid on the stockpot and place it in the refrigerator overnight. The sugar will begin to dissolve and form the syrup you need to “cook down” for the preserves.
  • The next morning, let the figs/sugar come to room temperature before you begin cooking them.
  • Once the pot is not chilled from being in the fridge, bring the figs and dissolved sugar to a gentle boil, and and let them simmer on a medium heat for a good half hour. Then turn the temperature way down and let the mixture simmer LOW AND SLOW until the figs darken and the syrup thickens. I usually simmer them from 90 minutes to a couple of hours. Stir often so they don’t stick. This is a project you can’t just leave! One good test is to take a spoonful of the syrup and put it on a plate – tip the plate and if it is thick and doesn’t “run,” it’s the right consistency. A nice slow simmer for a couple of hours is good.  If you have a very large amount of figs, you may need to cook them longer – just do the “thickness” test and that is a good indicator.
  • CANNING:  Bring your clean jars to a simmering boil in a large pot. Also put the bands and lids in a separate pot. Keep those HOT also by leaving them in a pot of simmering water also.
  • Carefully ladle the HOT fig preserves into the HOT jars, leaving about ¼” of headspace.
  • Put the lids and bands on – don’t screw the tops on too tightly – just finger tight so they can expand.
  • Carefully lower the jars of hot figs back into a large stock pot of hot water, covering the jars by at least an inch of water. Process them, or “water bath” the jarred preserves for a good 10 minute rolling boil.
  • After 10 minutes, carefully remove the hot jars with tongs and let them cool and seal on the kitchen countertop. I love to hear those popping sounds as the jars seal. One of life’s simple joys.

Get ready to make some homemade buttermilk biscuits. Generously butter them to enjoy with these delicious fig preserves. A Southern delicacy for sure. My biscuit recipe is also here on the blog!

Happy Preserve-Making & Canning ~ Gran Jan

Share

The Loft Link-Up [Potluck…]

THe_Loft_Link_Up

I’ve been away from “THE LOFT” for two weeks and I’ve missed this weekly connection with new friends and certainly my friend Leah Adams However, I thoroughly enjoyed some time away from my office and all things electronic and media – but I’m glad to be back today with this Potluck topic.

My dictionary app defines potluck as “a food or a meal that happens to be available without special preparation or purchase; a meal especially for a large group to which participants bring various foods to share; whatever is available or comes one’s way.”

To me, the word Potluck brings to mind memories of 38 years as a pastor’s wife and many, many, many (did I say many?) covered dish lunches, suppers, and fellowship times around the table. I believe meal time is so important and something sadly missing in today’s families. A time to relax, connect, and share conversation. When I was growing up we didn’t eat on the run, or really even eat “out” very often. Most families ate at home…together. Some of my sweetest memories surround being in the kitchen with my mother and my sisters.  Although I do recall many squabbles with whose turn it was to wash the dishes and whose turn it was to dry! Gotta love being raised in a house full of sisters. To this day one of my favorite times is when both of my boys have their feet back under their mama’s table! 3GenerationsSo for our potluck gathering today at The Loft I am going to literally share a potluck with you – some of my favorite recipes. Click on the title link below for each one and I hope you will try one, or some, or all of them. I will tell you that the meatloaf recipe receives more “hits” than any on my blog! So fun!

Icebox Banana Pudding

Morton Meatloaf – Delicious!

Cream Cheese Pound Cake

Jalepeno Cornbread Muffins

Southern Tomato Sandwich 🙂

Peach Cobbler!

Quick & Easy Lasagna

Buttermilk Biscuits

Happy Potluck! It’s Wednesday, how about that? Many churches have potluck suppers on Wednesday night!

GranJan-BlogSignature

Share

1,000 GIFTS, #11 to #23

Multitude Monday is here again, bringing with it the wonderful joy of counting gifts as encouraged by Ann Voskamp in her wonderful blog, A Holy Experience. I am also reading her book One Thousand Gifts  and there is a Book Club that will bless you greatly with weekly video discussions from Ann herself! I am on my way to counting gifts, as the author says, the graces of daily living. This week, I am going to count my blessings in pictures…all taken this past week on my Blackberry phone.


11. Sunday dinner with these two sweet girls last week while in Birmingham for a worship pastor’s conference with my husband. Here are Robyn, Sophie, and me. DELIGHT!

12.  A wonderful light and fluffy snowfall while in Birmingham…good for writing in mine and my sweetheart’s initials…on the hood of his truck!
13.  A snowy night…the view from our room at the Conference Center.
14.  Homemade buttermilk biscuits…my maternal grandmother’s recipe.

15.  Green cabbages harvested from my garden this past Saturday, 2-12-11
16.  A fire in my outside fire pit (a Christmas gift from my husband) this weekend…with a good cup of coffee and precious conversation with that sweet man…

17.  The sweetness of fruit and a grandboy who peeled his first clementine…all by himself!
18.  Hens on our farm, now producing eggs daily!
19.  These Valentine’s Day flowers were on my desk this morning when I arrived at work. My sweet husband had delivered them on his way to the church where he serves as worship/executive pastor. Pale pink and highly scented…my favorite.
20. Grandboy Zeke opening his Valentine’s Day card from Pop & Gran Jan…
21. Granddaughter Madie opening her Valentine’s Day card from Pop & Gran Jan…
22.  Grandboy Jackson opening his Valentine’s Day card from Pop & Gran Jan…
23.  A Valentine’s Day card from my husband, full of promises made and kept…

Grace-filled week and I thank you Father for all of the above, and for all that is yet to come, because of Your sweet grace…

 
Share